Look Good
Keep your style on track during cancer treatment, and learn how to deal with skin care, makeup, wigs, new looks, and more.
Chemotherapy and radiation can change your skin – make it very dry, itchy, flaky, or irritated. A few simple steps in the morning and at night can help you feel better and look healthier. Ask someone on your cancer care team about which type of products are best for you right now.
Cleanser: Cleanse your face in the morning and at the end of each day to help prevent pimples and acne flare-ups. Use warm water and a mild soap, foaming gel, or creamy cleanser that can be gently wiped off.
Moisturizer: A moisturizer replenishes the moisture your skin may lose during chemotherapy, as well as from exposure to heat, dry weather, or sun. If possible, apply moisturizer while your skin is damp.
Sunscreen: Use a sunscreen with an SPF (sun protection factor) of 30 or higher whenever you are outside. This is a must for everyone, but it's especially important for anyone getting chemotherapy as their skin may be more sensitive to sun and burn very easily.
Lip Protection: Colorless lip balms with an SPF of 30 or higher can protect your lips from sun damage, wind, and cold while also providing moisture.
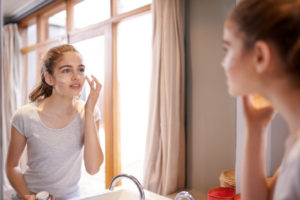
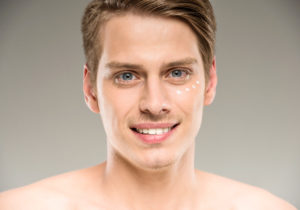
Girls and Guys – Maybe you’ve used makeup before or maybe not. We talk about a number of options that can help enhance your good features, camouflage skin changes caused by cancer treatment, and brighten your overall appearance to help you feel better. You can choose whichever steps are right for you.
Concealer: A concealer helps hide imperfections in your skin and can cover the skin changes you may experience during treatment, such as dark circles under your eyes, redness or skin color changes, and discoloration. Pick a concealer that closely matches your skin color.
- Apply the concealer in dots to the areas you wish to correct. Medicated concealers are also available to help fight acne while concealing flare-ups, but talk to your cancer care team before trying any of them.
- Blot or lightly spread the concealer evenly around the area with your finger or a sponge.
Foundation: If you want to use foundation, look for one that matches your skin tone. Tinted moisturizers with an SPF of 30 or higher are a good way to add a little color while protecting your skin from dryness and the sun.
You may need a moisturizing foundation made for dry skin.
Lay the foundation:
- Apply dots of foundation to your forehead, nose, chin, and cheeks with clean fingers or a disposable cosmetic sponge.
- Blend outward and downward from the center of your face to the edge.
- Blend well at the hairline and the jawline.
Hygiene tip: Apply makeup with clean hands or use disposable cosmetic sponges; remember to use a new sponge for each application.
Powder: A light application of a translucent powder will set your foundation and dim any “shiny” areas on your face.
Blush: Blush can give you a vibrant, healthy look. Use a brush to fluff powder blush over your cheekbones and out toward your ears. Contouring with brownish powder can help hide puffiness due to weight gain, while light-colored blush can help enlarge areas on a thin face.
Bronzer: Bronzers come in both liquid and powder forms. For a liquid bronzer, use the same application technique described for foundation. When using a powder bronzer, use a cosmetic brush or sponge to apply the product to the face. Guys may prefer to use a bronzer versus a blush product. Bronzers should be applied after moisturizing the skin.
Eyebrows: You may need to fill in thinning brows or re-create an entire brow. Here are some tricks to help you re-create that brow:
- Find your brow bone with your fingertips. This is your natural brow line where you will re-create your brow. Using a brush-on eyebrow color or a pencil in a shade that matches your eyebrows, hold the pencil or applicator straight up against your nose, parallel to the inside corner of your eye. This is where the eyebrow should begin. Draw a dot just above the brow bone.
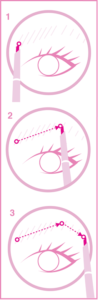 Looking straight ahead, place the pencil parallel to the outside edge of the colored part of the eye. Place a dot where the highest point of the brow should be.
- To define where the outside edge of the brow should go, place the pencil diagonally from the bottom corner of your nose past the outside corner of your eye, and draw a dot. Be sure the outer edge of the brow is not lower than the inside one, as this will create a down-turned expression.
- Once you have the dots placed, connect them into a brow line with feathery strokes of color, making the brow fuller on the inside and thinner as you move toward your hairline.
You might find it easier to use a brow stencil. These are usually available in stores offering skin care and cosmetic products.
Helpful tip: Sharpen your pencil before each application.
Eyeshadow: Eyeshadow brightens your look and helps define your eyes.
Application tips:
- Choose a neutral matte eyeshadow palette.
- Sweep a light shade over the entire lid and up to the brow.
- Apply a darker shade in a sideways “V” on the outer corner of the lid, starting from the lash line and extending into the crease.
- Apply a highlight shade under your brow, if desired.
- Blend well to soften the effect.
Hygiene tip: Use a new cotton swab for each color and each eye.
Eyeliner: Eyeliner works to re-create the look of lost lashes, define the lash line, and create the illusion of full lashes.
- Using a liquid or pencil eyeliner, draw a line using short strokes close to the lash line (a dark brown, gray, or black color liner works best).
- Holding the eyeliner on a slant, starting from the inner corner of the eye, create the line at the very base of the lash line.
- Repeat the above steps on the bottom lash line, if desired.
- Using a cotton swab, gently blend.
Mascara: Mascara can restore a lush look to thinning lashes.
- Apply first to the top side of the lashes and then to the underside.
- Brush the mascara wand lightly across the lower lashes.
- Completely remove mascara every night with a gentle eye-makeup remover. Try using a wash-off mascara instead of a waterproof mascara. It's much easier to remove and doesn't pull on lashes.
Hygiene tip: More than any cosmetic, mascara is prone to bacterial infection. Don’t pump the wand in the tube as this may introduce bacteria. Replace your mascara every month while getting treatment.
You can also brush the tip of the mascara wand lightly back and forth across the lower lashes for a more dramatic look.
Lips: The addition of color to your lips helps to brighten and enhance your overall look. For outdoor sports and leisure activities, use a lip protection balm with an SPF of 30 or higher instead of, or in addition to, lipstick. Some lipsticks also have an SPF of 30 or higher.
If your lips are very dry, use a moisturizing lip balm at night.
Chemotherapy can sometimes cause changes in your nails and nail beds. For instance, you may find that your nails are more brittle and break more easily, have grooves, change color, are more sensitive, and grow at a faster or slower rate. You may also notice that nail beds lift up. Keep your nails short if any of these changes happen. Nail changes almost always go away over time after treatment ends.
Tips for keeping nails healthy:
- Do not cut your cuticles. Instead, use a cuticle stick to push them back.
- Massage cuticle cream into your cuticles. This helps prevent dryness, splitting, and hangnails.
- Wear gloves while washing dishes, washing your car, giving your dog a bath, or doing other chores. Try not to keep your hands in water for very long. This can lead to problems, like fungal infections of the nail bed.
- Wear clear or colored polish or nail hardener to protect nails and keep them strong.
- Use an oily non-acetone remover to take off polish. Acetone removers can be drying, and very dry nails can become weaker or more brittle during treatment.
- Do not wear glue-on nails or acrylic or gel nail sculptures during treatment. They could increase your chance of infection.
- Tell the doctor if you notice any signs of inflammation or infection, such as pain, redness, darkening, or lifting of the nail bed.
- Avoid the nail salon during treatment to lessen your risk of infection. If you do decide to get a professional manicure or pedicure, bring your own clean instruments for the technician to use. And don’t let them cut your cuticles!
Hair loss is probably the most obvious appearance change caused by treatment. It occurs in varying degrees for different people: some lose all their hair; others find it simply looks thinner. You can deal with hair loss in a variety of ways that are fun, creative, and effective.
Before you start treatment, and if your doctor has told you that you will most likely lose your hair, consider cutting your hair short before you begin to lose it. Shorter hair looks thicker. Also, save a lock of your hair so you can match the color later if you decide to get a wig. Guys, a close-cropped haircut is a popular choice, and easy to care for.
Helpful tip: If you decide to shave your head, don’t shave it all the way to the scalp because this may cause irritation. It is recommended to cut hair to 1/8 of an inch.
When natural hair starts to grow back, check with your cancer care team and your hairstylist before using chemical treatments, including perms, color, or straighteners.
Wigs today are fantastic! They’re easy to care for and can give the appearance of thick, healthy-looking hair without looking too much like a wig. They’re available for both girls and guys in a huge variety of ready-made and custom-made styles and colors. Here are some things to consider if you’re thinking about getting a wig:
- The cost of wigs varies greatly.
- Try on several wigs before deciding which to buy.
- Bring your parent(s) or best friend to help you choose a wig.
- Health insurance may cover the cost of wig; ask your doctor to prescribe a “cranial prosthesis.”
- Wigs are made of either synthetic materials, human hair, or a blend.
- Human-hair wigs are generally more expensive and require more care.
- Most wigs have more hair than is needed so they can be cut and styled to fit your needs.
- A hairstylist may be able to help you with wig fitting and styling.
- Wear a wig cap to help protect your head from irritation and keep the wig secure on your head.
- You may be able to get a free wigs:
- Some American Cancer Society offices offer wig banks for those who are eligible. Contact your local American Cancer Society office to inquire.
- EBeauty Inc. is a charitable organization that provides women access to wigs during cancer treatment. They supply a free wig to anyone who needs it. Visit EBeauty.com for more information.
- The “tlc” – Tender Loving Care catalog provided by the American Cancer Society offers a wide range of wigs, scarves, and other head coverings at affordable prices to help women with cancer who are experiencing hair loss. Visit tlcdirect.org for more information.
Wig Styling:
- Always use a vent brush or pick for curly styles and a wire brush for straight styles.
- Avoid using standard hairbrushes because they can create excessive tension, over-stretching the hair and damaging it.
- Think “reverse” when brushing your wig. Start from the bottom of the wig. Using a wire pick, gradually work the hair from the ends to the root area.
Wig Care – Here’s how to care for your wig!
When to wash:
- Generally, a wig should be washed after 6 – 8 wearings in spring and summer, and 12 – 15 in fall and winter.
- If you are physically active while wearing your wig, you should clean it at least once a week to remove the perspiration and dirt that can build up.
- Other factors affecting how often to wash your wig include air quality and humidity (just as they do with your own hair).
How to wash/dry:
- Before washing, brush straight styles gently but thoroughly with a wire brush. Brush curly styles lightly with a vent brush or pick, keeping the curls intact.
- Fill sink with cool water, and add a cap of gentle shampoo or wig shampoo.
- Turn the wig inside out, and gently immerse your wig and allow it to soak for two minutes.
- Drain the sink and refill with fresh cool water, then immerse wig a few times to rinse.
- For high shine and softness, apply a gentle conditioner or wig conditioner, and leave on for five minutes. Then rinse well by swishing in clean, cool water.
- Gently towel-blot the wig to remove excess water. Do not squeeze or twist.
- Place the wig on a wire wig stand or on a tall soda bottle to dry. (It takes about 8-12 hours.)
- Never comb or brush a wig when it’s wet; wait until it’s completely dry.
- Do not dry your wig in direct sunlight.
- Be careful not to use high heat from hairdryers or curling irons on synthetic wigs.
Turbans are inexpensive and a good choice for girls to wear at home instead of a wig. You can buy them ready-made or make your own with a scarf or bandana. Choose fabric that’s 38 inches (adult size) or 24 inches (younger teens) in length to wrap around your head and tie securely.
Scarf Tying
Instructions for tying an oblong scarf:
- Drape scarf over your head, and let ends hang down evenly on the sides.
- Tuck in excess hemline of scarf before securing in a knot at the nape of your neck. Tie a double knot in the back.
- Bring one of the ends over your shoulder, if you like.
- Try topping it off with a hat!
Helpful tip:
- To add height to a turban or scarf, try “velcroing” or pinning a shoulder pad inside the turban or scarf at the crown of the head, or put the pad under a wig cap and wear the turban or scarf over the wig cap.
- Choose a scarf made of a soft cotton blend, rayon, or polyester to help keep it from slipping.
- A cotton headband can also be used to secure a scarf on the head.
Square Scarves and Bandanas are great for guys and girls for a quick, easy, and inexpensive way to cover your head. Cotton bandanas are also cool and comfortable and especially good to wear when playing sports.
Instructions for tying a large square scarf or bandana:
- Fold bandana in half into a triangle.
- Put the flat edge of the triangle at your hairline, and center it on your forehead at your hairline.
- Tie the two corner points together in a knot in back of your head at the base of your neck.
- You can tuck the third point into the knot, and tuck any extra fabric behind your ears.
Helpful tip: To make scarves and turbans more visually interesting, try layering them or using accessories like pins and headbands. You can also use earrings as another way to accessorize.
T-shirt Wrap
The T-shirt wrap is cool and comfortable and especially good to wear when playing sports. Here’s how to make one:
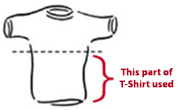
- Use a large, all cotton T-shirt.
- Cut straight across the shirt, just under the sleeves. You now have two pieces – the top 1/3 of the shirt (neck and sleeves) and a fabric “tube,” which is the bottom 2/3.
- Take the finished T-shirt hemline of the “tube” and center it on your forehead at your hairline.
- Holding each side of the tube at the back of your head, cross the piece of fabric in the right hand over the left, creating a figure “8.”
- Twist the fabric at the bottom of the figure “8” before pulling the lower half of the figure “8” from the back up and around your head toward the front, creating a headband. This creates visual interest and makes the band tight enough to stay secure. Tuck in any extra fabric under the twisted band.
- The final result will look like a cotton turban with a matching headband going around your head. You can accent the t-shirt wrap with mini bangs, a “halo” (a hairpiece designed with comfort in mind, as the top part of the head is left uncovered to provide breathability under a hat, scarf or other head covering), or even a clip on ponytail.
- Now take the top 1/3 of the T-shirt, cut off the two sleeves at the shoulder, and use them as headbands.

Hats are a great accessory for both guys and girls. During treatment, hats are an easy and comfortable way to conceal hair loss and protect your head. Trying on hats can be fun, and there are a lot of styles to choose from. Did you know that some hats can be purchased with an attached hairpiece (such as a ponytail, bob, or bangs)? Check out wig stores, department stores, hair salons, and catalogs, and explore online to find a look you like.
Helpful tip: Make sure that the hat you select feels good on your head and doesn’t irritate your scalp.
Look Good Feel Better is a collaboration of:
![]()
© 2017 The Look Good Feel Better Foundation
Look Good Feel Better® is a registered trademark of the Look Good Feel Better Foundation.
The Look Good Feel Better Foundation is a 501(c)(3) organization.
![]()
This website is made possible through generous grant support from P&G Beauty.